Maximize your productivity with Asana My Tasks
Modified on Fri, 12 Jul, 2024 at 12:43 PM
In this article, we'll explore the various features and strategies for optimizing My tasks in Asana, from creating sections and automating tasks with rules to using custom fields and selecting the perfect view for your needs.
What is My tasks?
My tasks brings your to-do list into one centralized location and helps you prioritize tasks effectively by connecting your work with your to-do's. Here's where you will find all the tasks assigned to you.
Adding tasks to My tasks
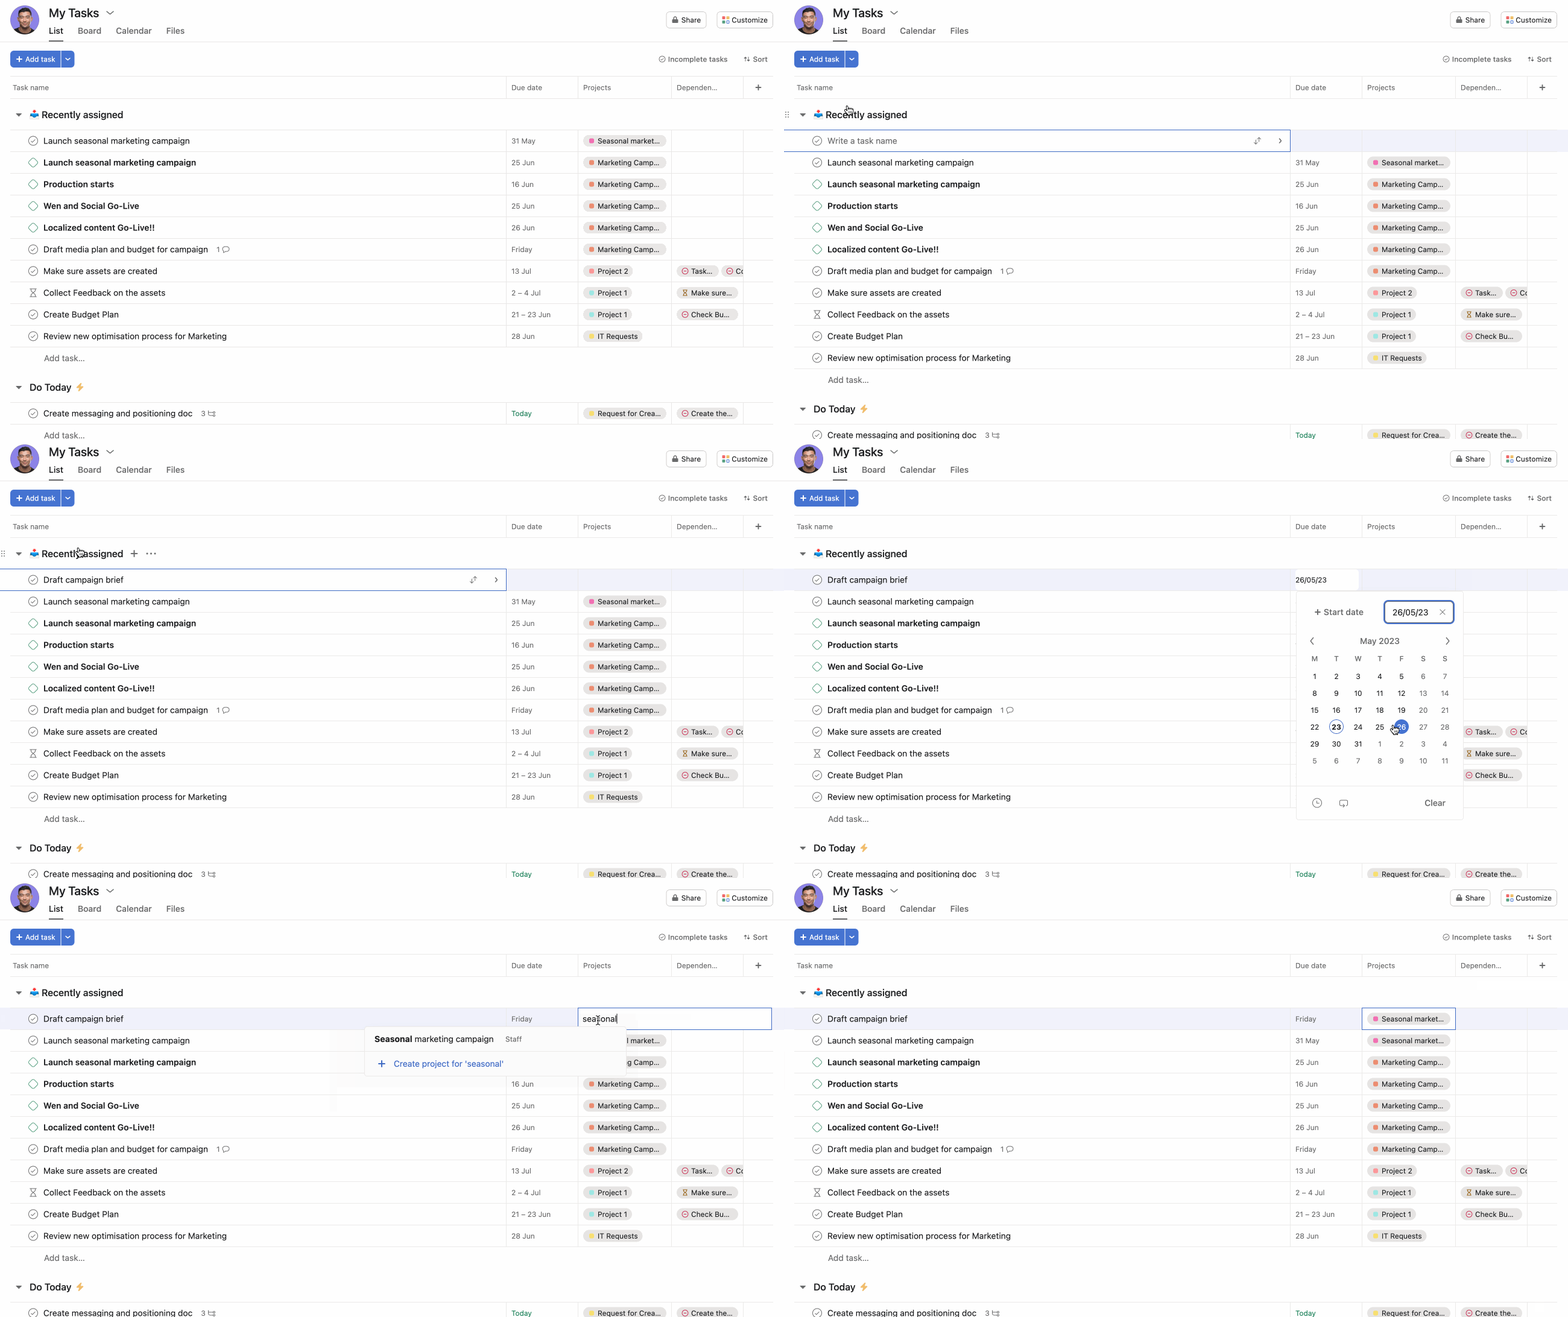
- Start by adding all your to-do's to your My tasks, and start the task title with an action verb—for example, Draft campaign brief or Create visual assets.
- Give these tasks a due date so you and the stakeholders you're working with know when they should be completed; this will help you prioritize them.
- Multi-home your tasks to relevant projects; this helps you connect the work you're doing. For example, you can add your Draft campaign brief task to the Seasonal marketing campaign project.

Task visibility
Any task created in your My tasks is automatically private to you. However, if you multi-home this task, the task becomes visible to members of that project. There's a task visibility column in your My tasks where you can see to whom the task is visible.
Visibility types are:
- Only me: Visible only to you
- Company name: Visible to everyone in the company
- Collaborators: Visible to its collaborators and people who have access to the task's project
- See parent: Visible to collaborators and people who can see the parent task
In this example, you can see that the top of the task says, This task is private to you. You can make it public by clicking the Make public button. If the task is added to a project, it will be visible to task collaborators and project members. If you want to link a task to a project without making it visible to others, you can @mention the project in the task description.
Organizing your My tasks
Create your own sections
Everything in My tasks is, by default, assigned to you, and all new tasks assigned to you will automatically go to your Recently assigned section.
You can create your own sections to categorize your work according to your needs. Once you've created sections, you can drag and drop tasks into them.
Here's an example of how your sections could look like. You can add as many or as few sections as you prefer. You can start with these simple three: 'Do Today,' 'Do this week,' and 'Later.' You can always change your sections over time based on your needs.
Sort, filter, and group by
Once you have all your to-do's in My tasks, you can sort and filter your tasks by due date, project, or within sections and by due date. For example, you can filter to see only "Incomplete tasks" and "Due this week."
You can also group your tasks based on your needs. For example, you can group by "Project," "Custom sections," or "Priority."
Use custom fields to prioritize tasks
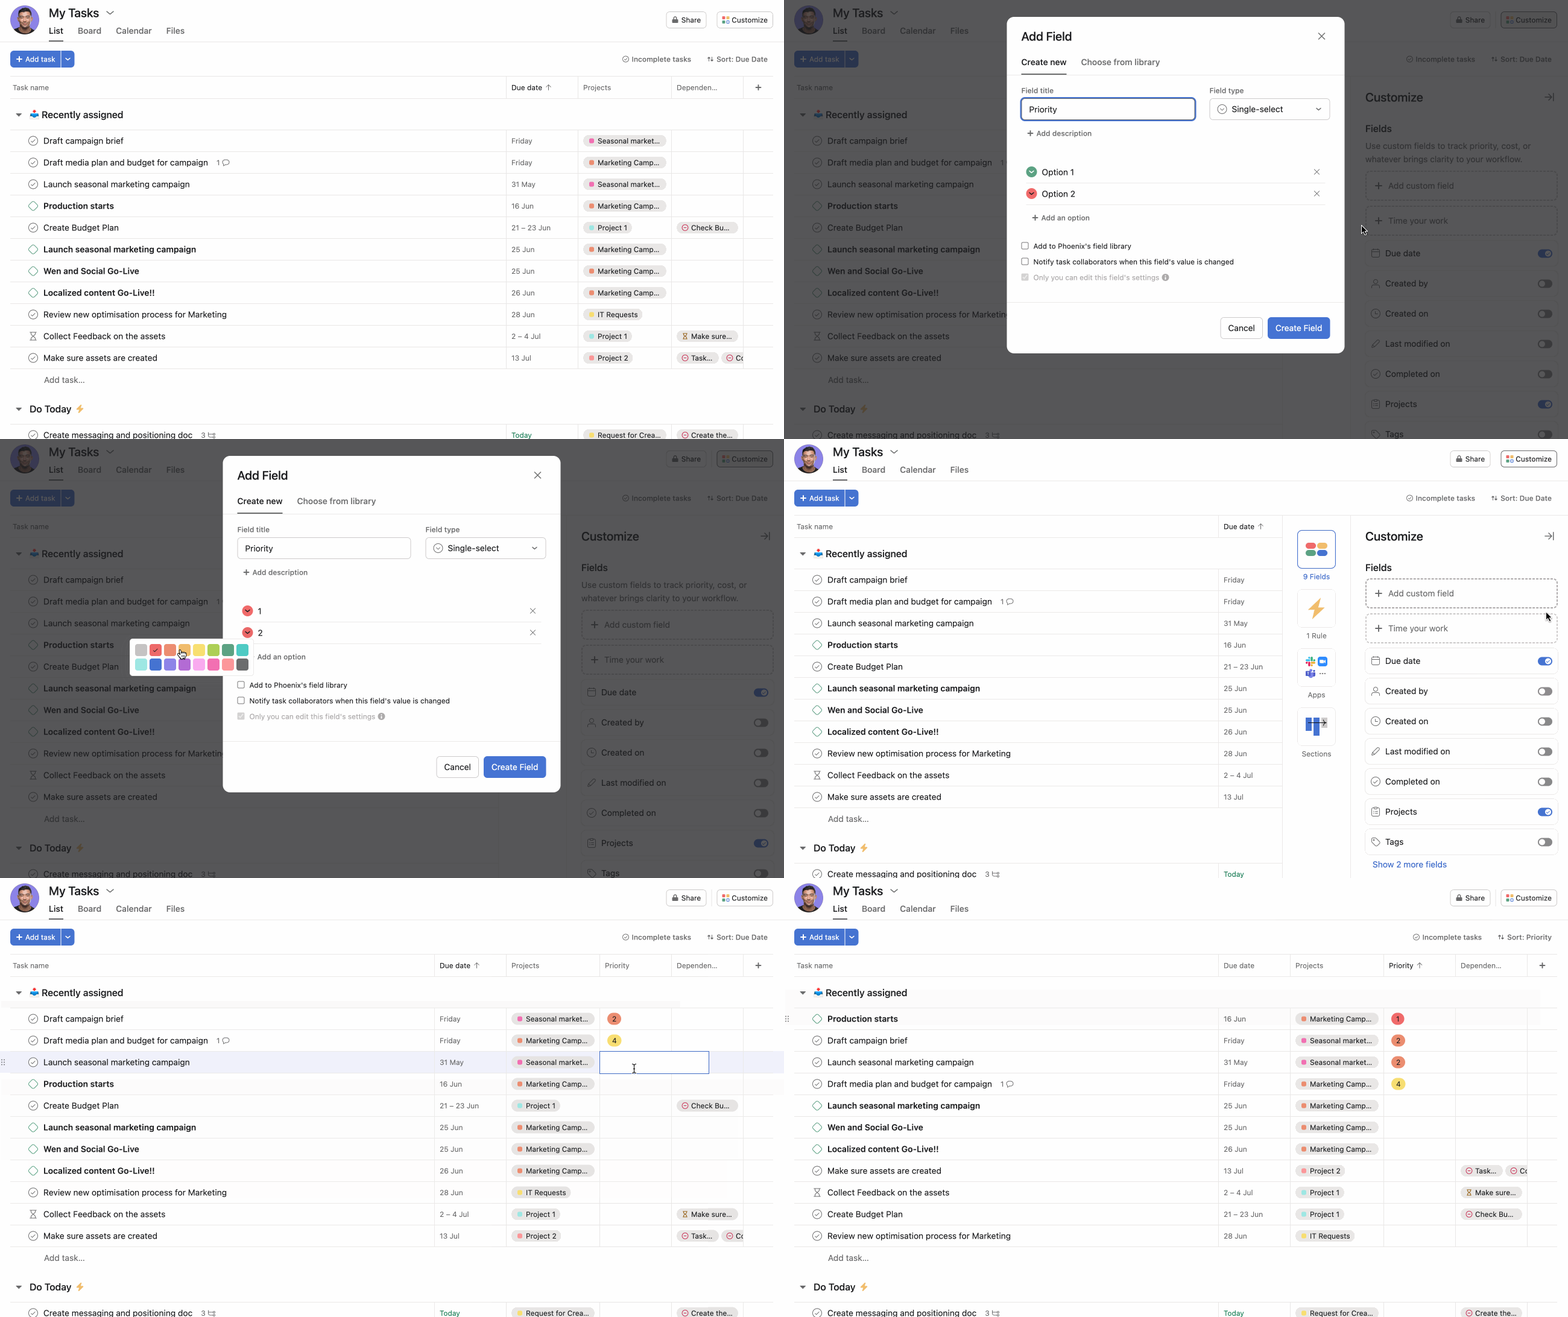
Create custom fields in your My tasks to sort your tasks and track work according to your needs. For example, you can create a Priority custom field and view your high priority tasks at the top of your list.

Automate your My tasks with rules
You can automatically move tasks to sections based on specific criteria using rules. For example, you can set a rule to move tasks to your Do Today section using the trigger Due date is approaching and the action Move task to a certain section.
Once you create the rule, a lightning bolt will appear next to the section.
These rules will run between midnight and 1 am, so you won't see it action immediately.
You can create a Snooze section to add all the tasks that can be pushed back. Create a rule that changes the due date to one week later every time you add a task to the Snooze section.
Choose a view that works for you
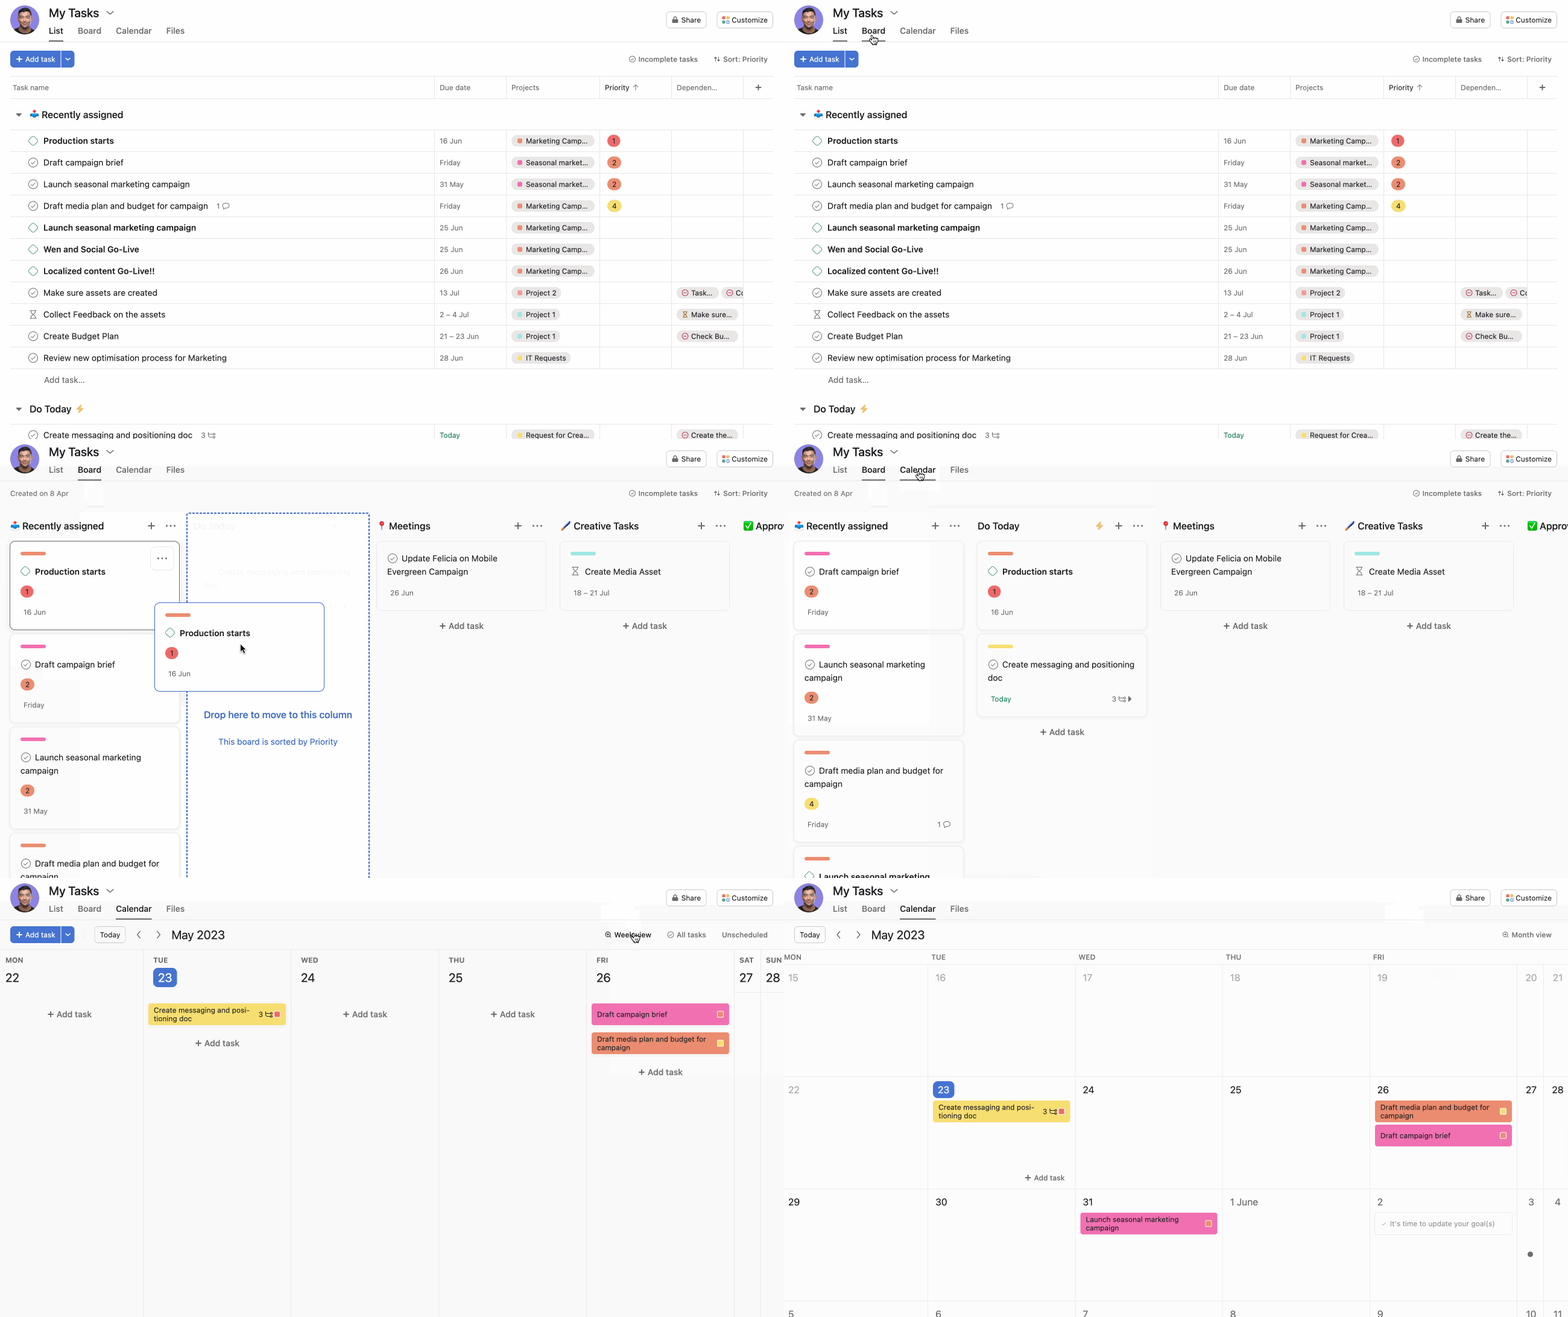
You can view your tasks in a list, board, and calendar view. A list view will organize your tasks in a list template. If you prefer a more visual overview, you can use board view, where you can view tasks like sticky notes on a Kanban board. A calendar view can help visualize your tasks due that week or month.

Schedule your tasks
Plan ahead
Stay on top of your work by checking your My tasks daily. This way, you won't miss any new tasks assigned to you or tasks with approaching deadlines.
Sometimes, one task can be a day's worth of work. If this is the case, we recommend dividing it up into smaller chunks of work by creating subtasks.
Block time for tasks
Block time in your calendar to complete tasks that require 30 minutes or more. When doing so, create an event in your calendar with the same title as the task. You can also add the task link in the event's description.
You can use the Clockwise integration to schedule your tasks into your calendar without leaving Asana. Once you've set up the integration in your project, click Schedule task on calendar from your task, and Clockwise will reserve time in your calendar.
Clockwise is only available with Google Calendar.
Was this article helpful?
That’s Great!
Thank you for your feedback
Sorry! We couldn't be helpful
Thank you for your feedback
Feedback sent
We appreciate your effort and will try to fix the article